![]()
Documentation, Help and How Tos
Loading GPS from Computer
Need Help? Call or Email: (989)-751-6863 or help@vvmapping.com
Loading your GPS's internal memory is best done with Garmin's software. Their software is available for free download from their web site and/or may have come on CD with your GPS.
Our recommendation is to use the memory card we provide. You can also use our Card Installer to load your own card.
If you want to install the maps directly to your GPS, then using Garmin's software is the best option as there are many variables on where the files must be installed and what their names should be depending on model of GPS.
Jump to Updating Maps with Windows.
Windows:
Using Garmin's BaseCamp
BaseCamp is a free program from Garmin. You can download it here: https://www.garmin.com/en-US/shop/downloads/basecamp or from this alternate site: http://www.gawisp.com/perry/mapsource/BaseCamp_462.exe
BaseCamp uses Garmin's MapInstall. If you install the version from Garmin's site, it will include version 4.2 of MapInstall which will not "install" maps correctly. Please see this help note on how to put version 4.0.4 on your computer.
You'll need to install our maps to the computer using our Computer Installer. Then install BaseCamp (it's OK if BaseCamp is already installed).
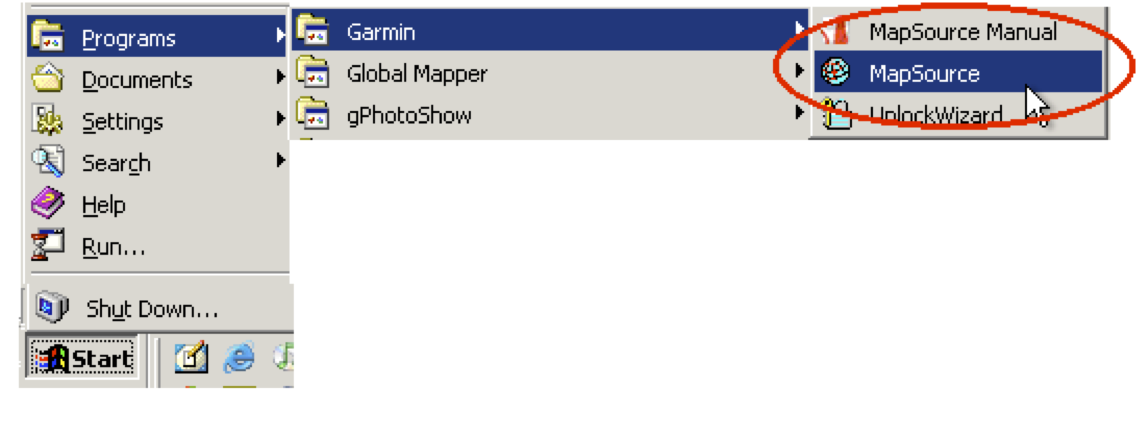
Next, open BaseCamp. It will be in your Start Menu, under Programs and under Garmin.
Pull the Maps menu down in BaseCamp and ensure our maps are installed (they will be listed) and if so, choose "Install Maps" from the same Maps menu.

BaseCamp will now open the MapInstall program.
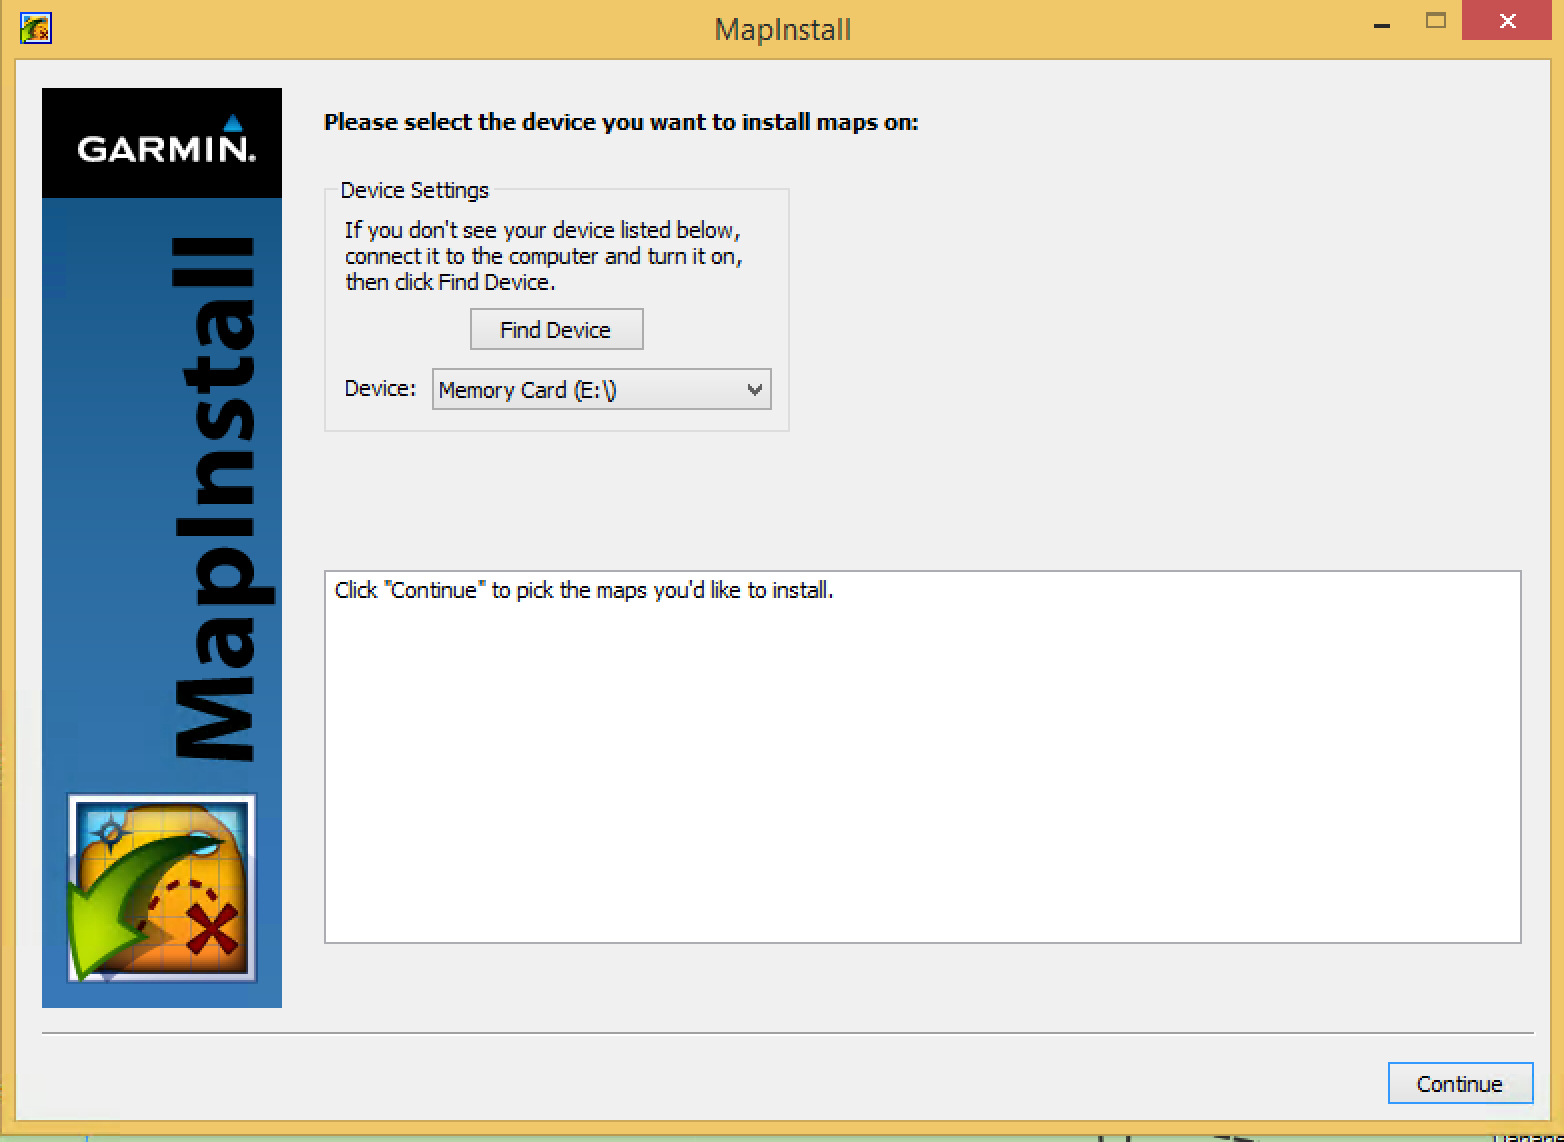
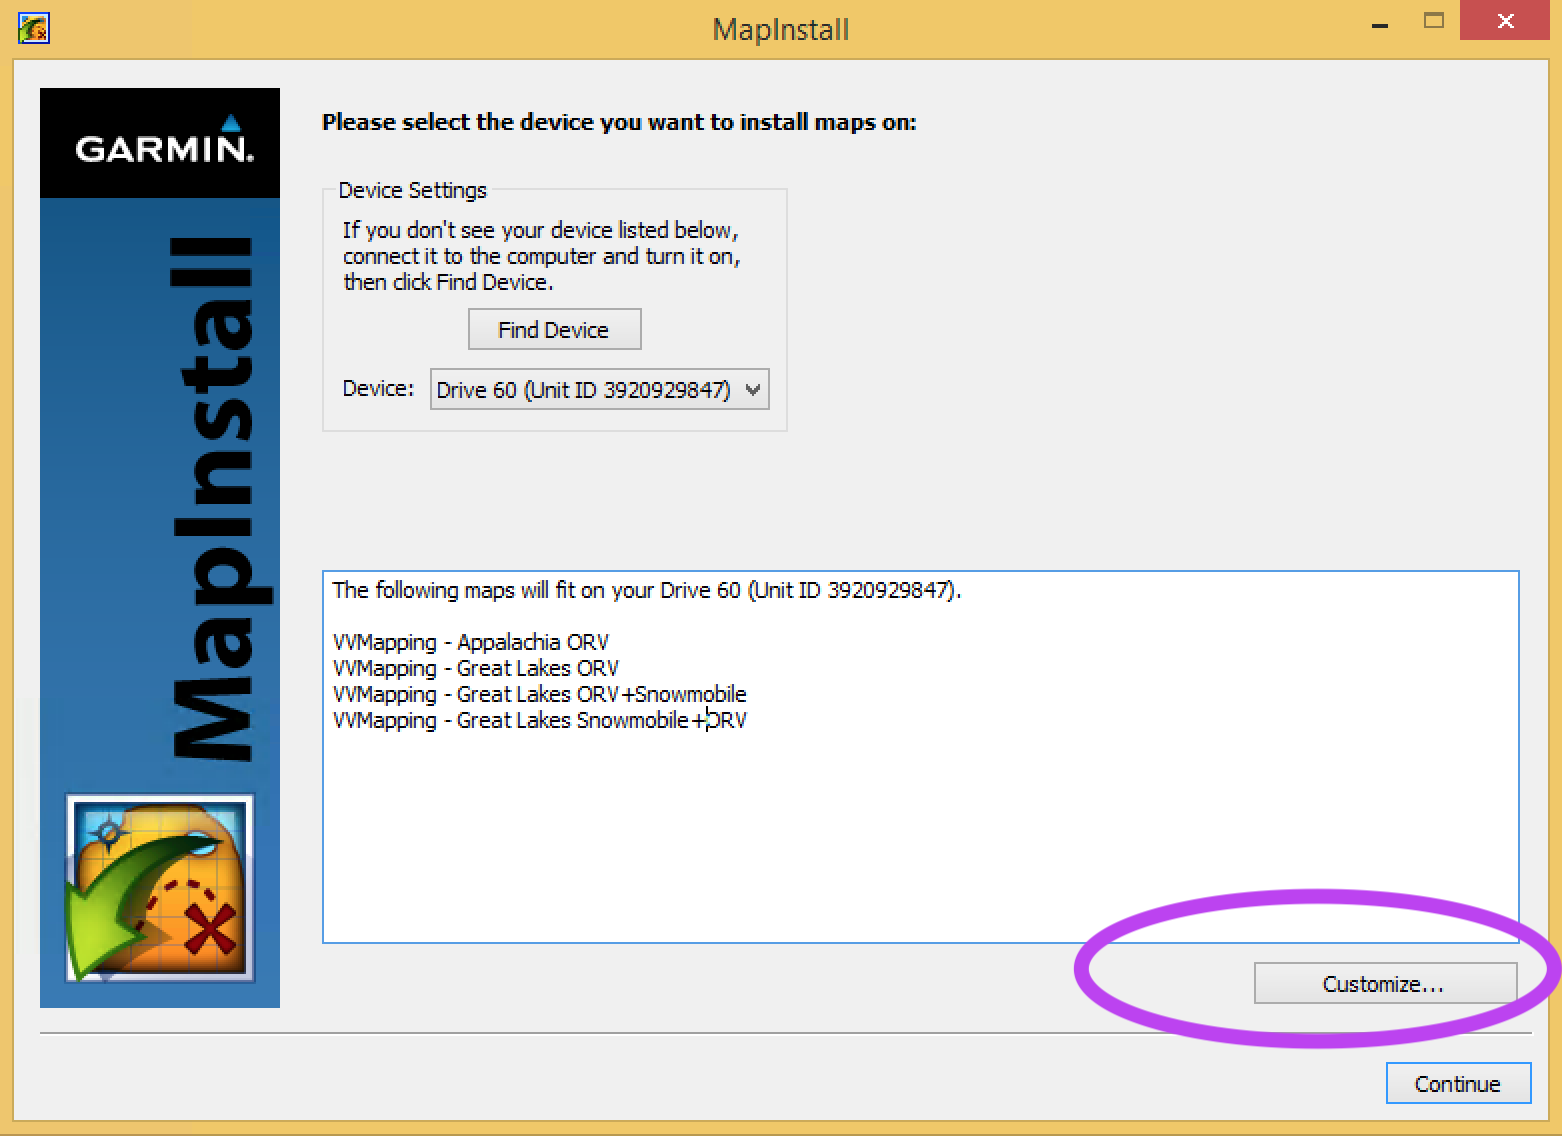
If a GPS is connected, it should be listed and MapInstall will offer to install our maps.
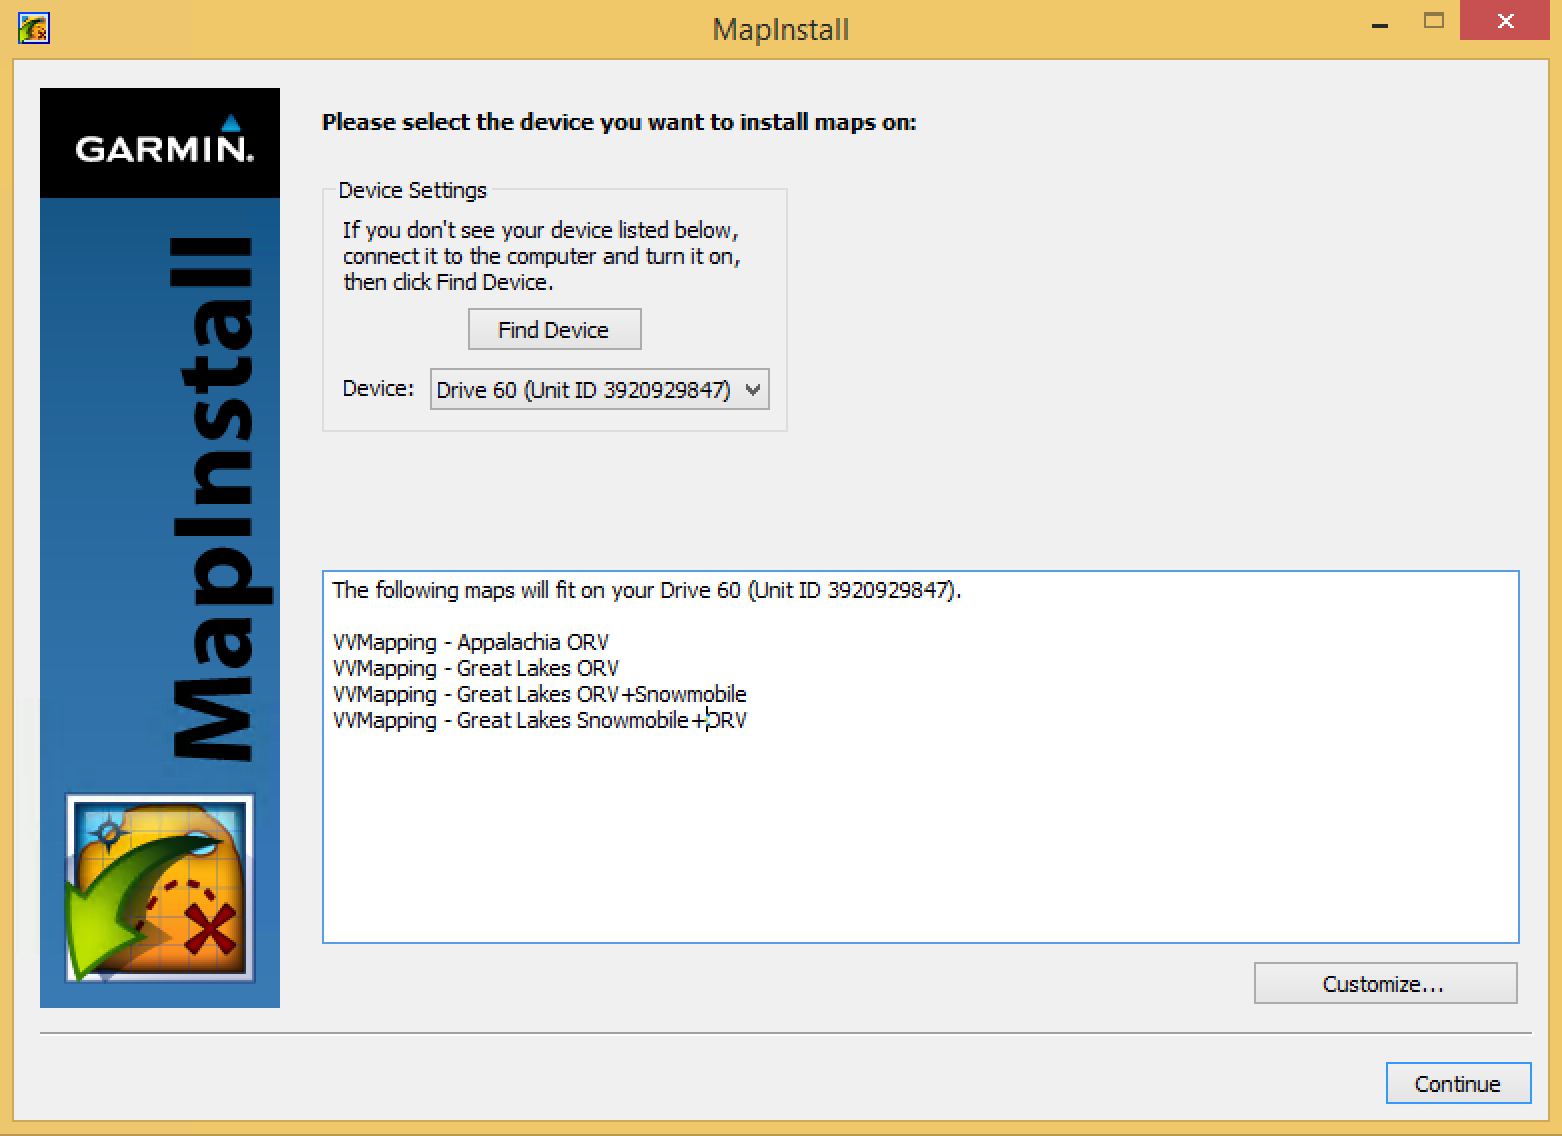
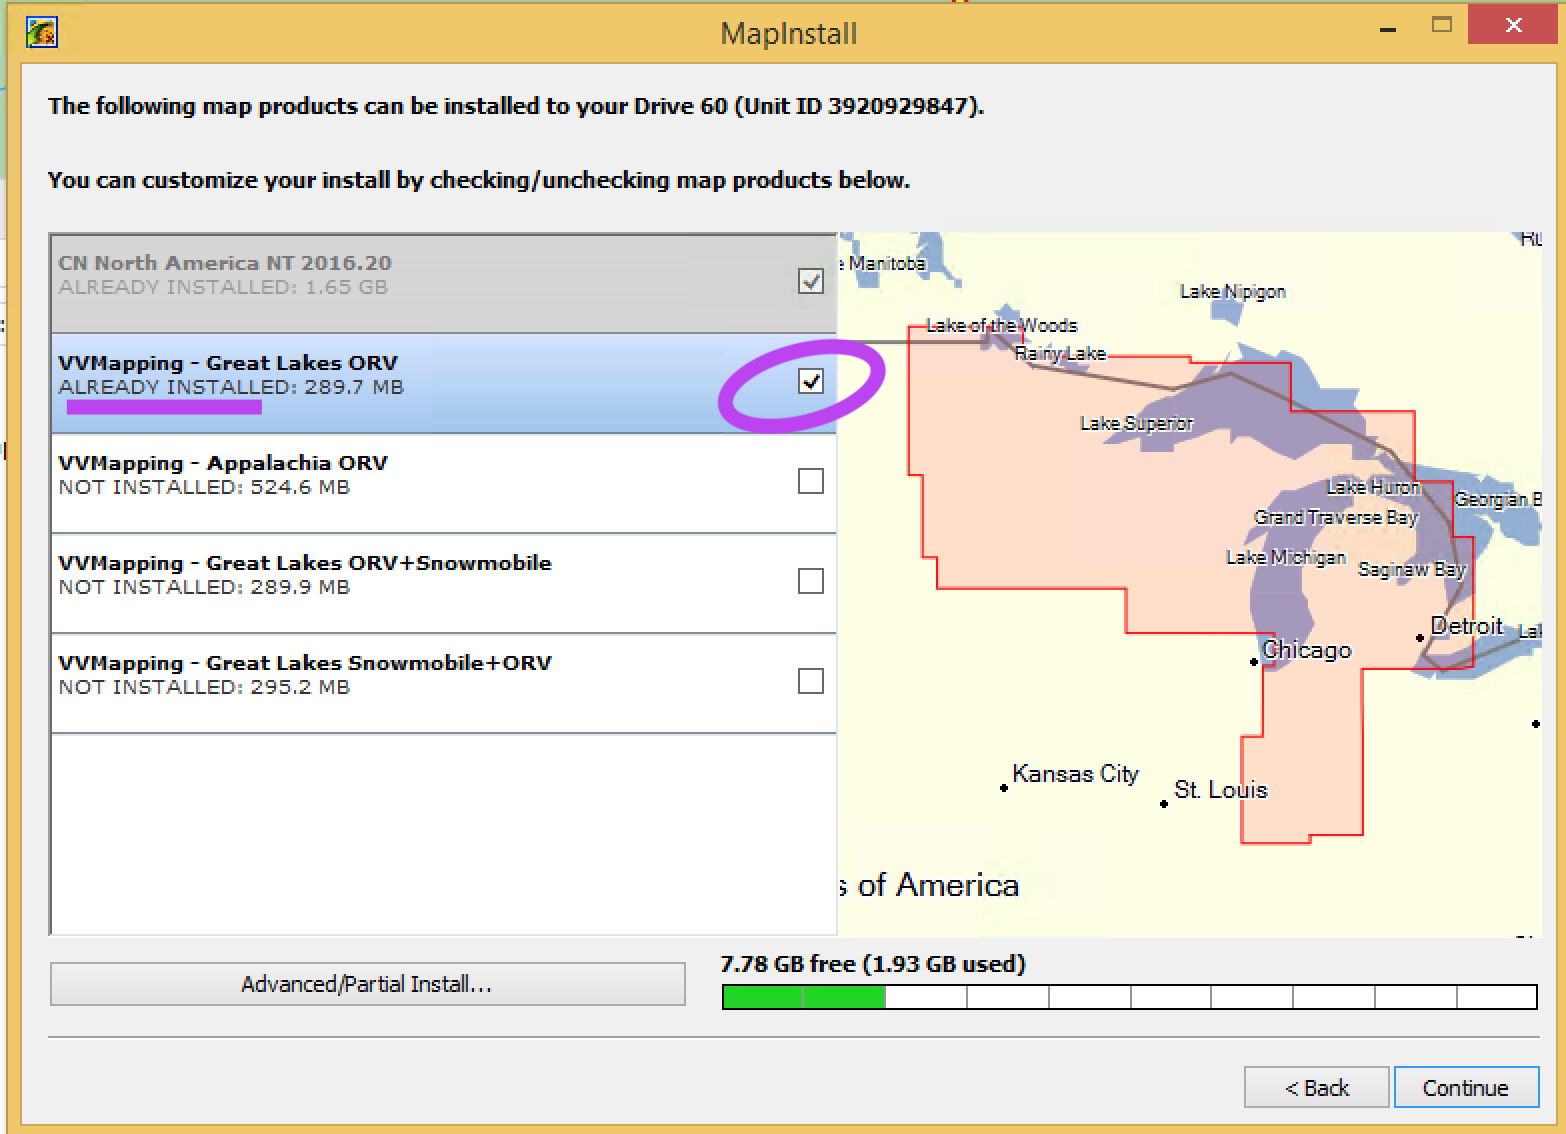
If you are good with it's choices, hit Continue, if not, hit the Customize button. Check or uncheck boxes as necessary and then click Continue.
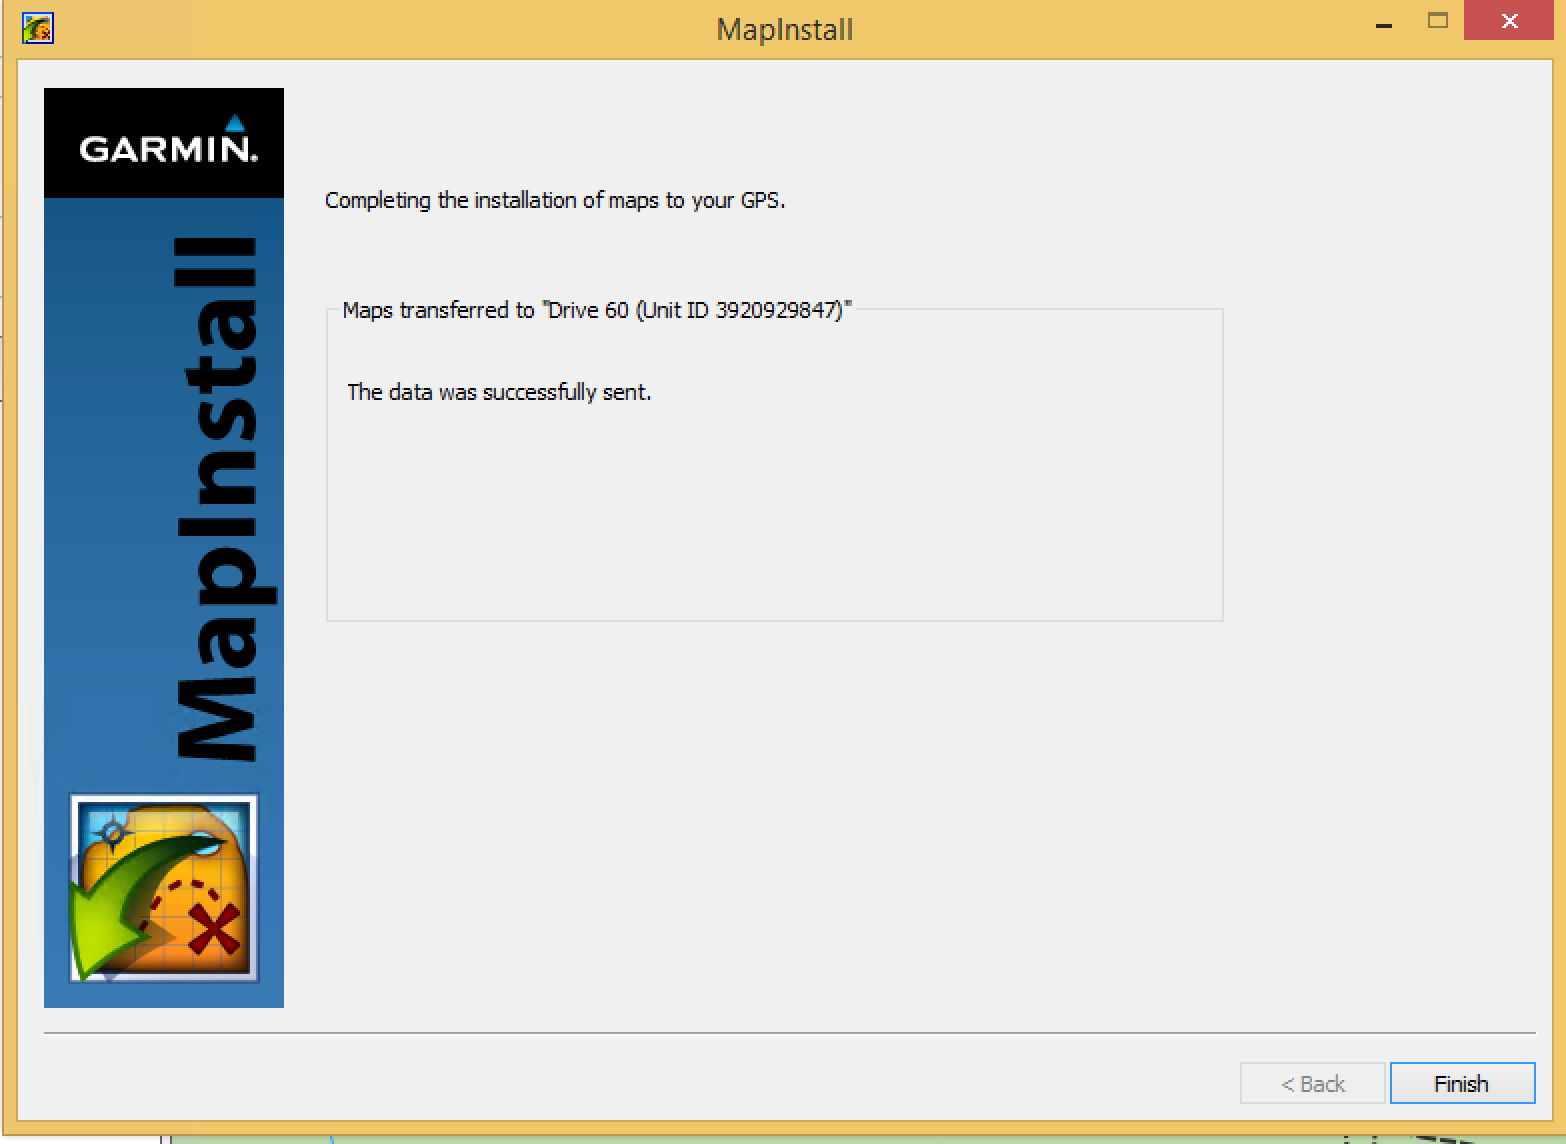
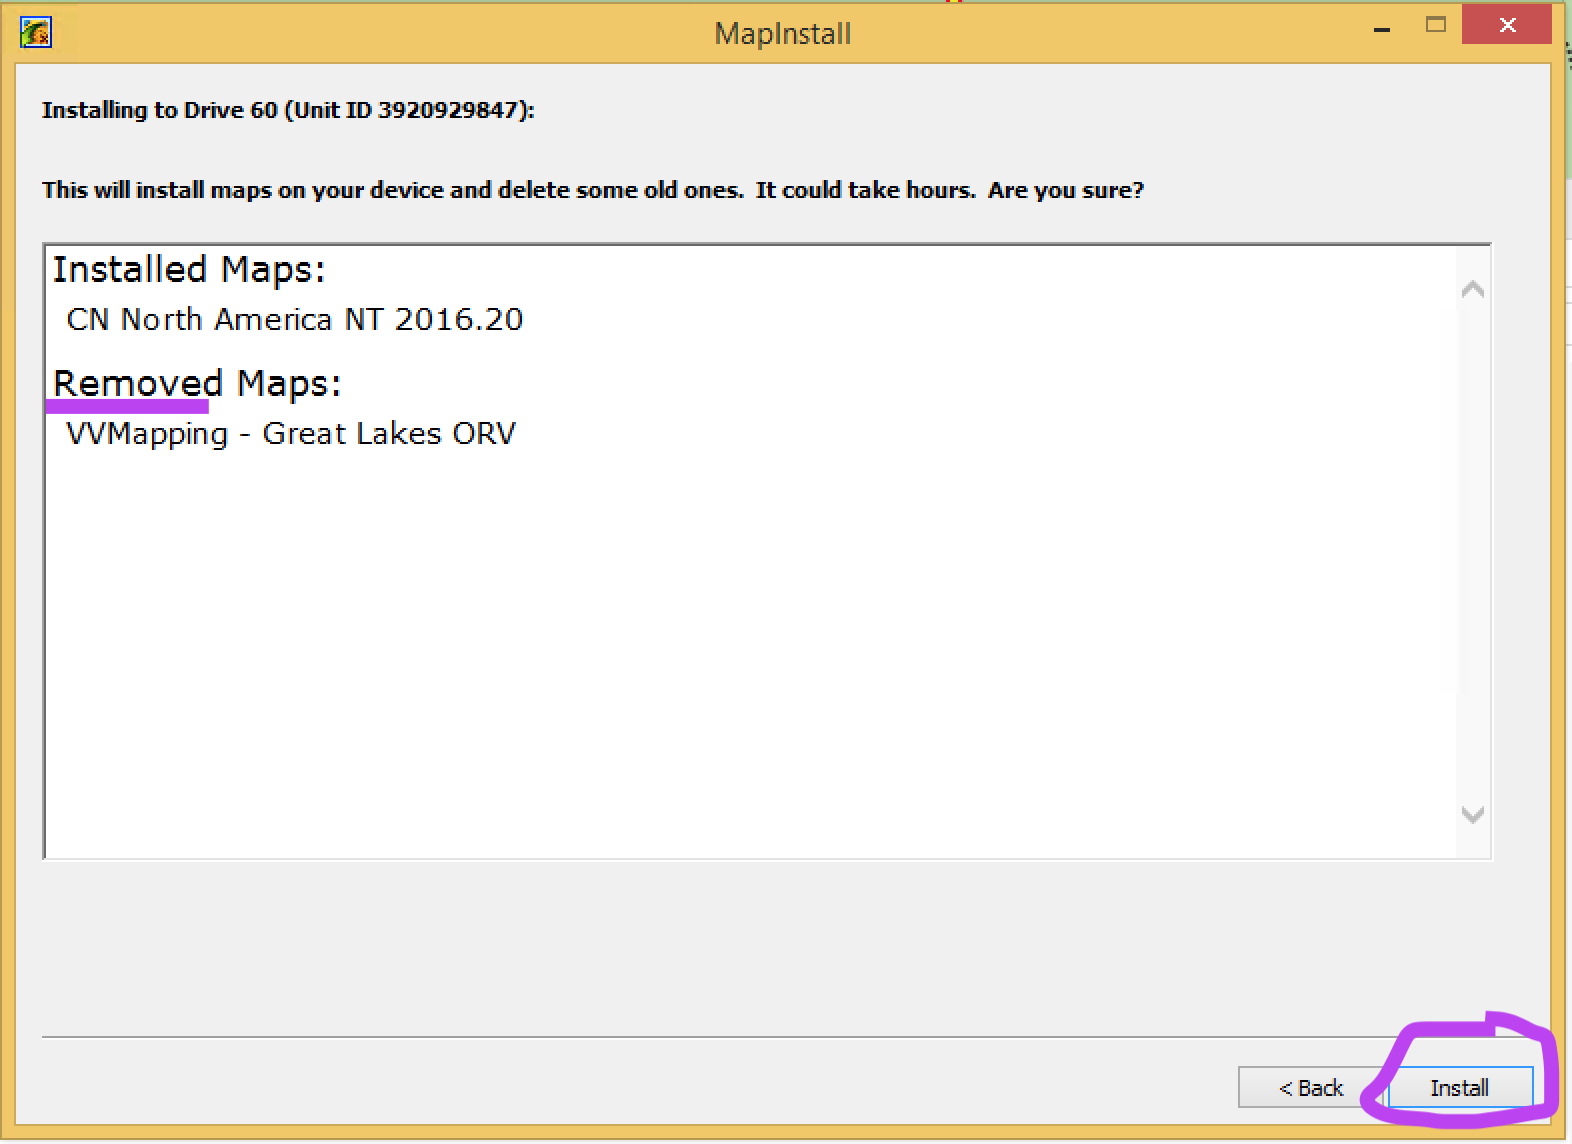
It will show a summary of what will be installed. Click the Install button.
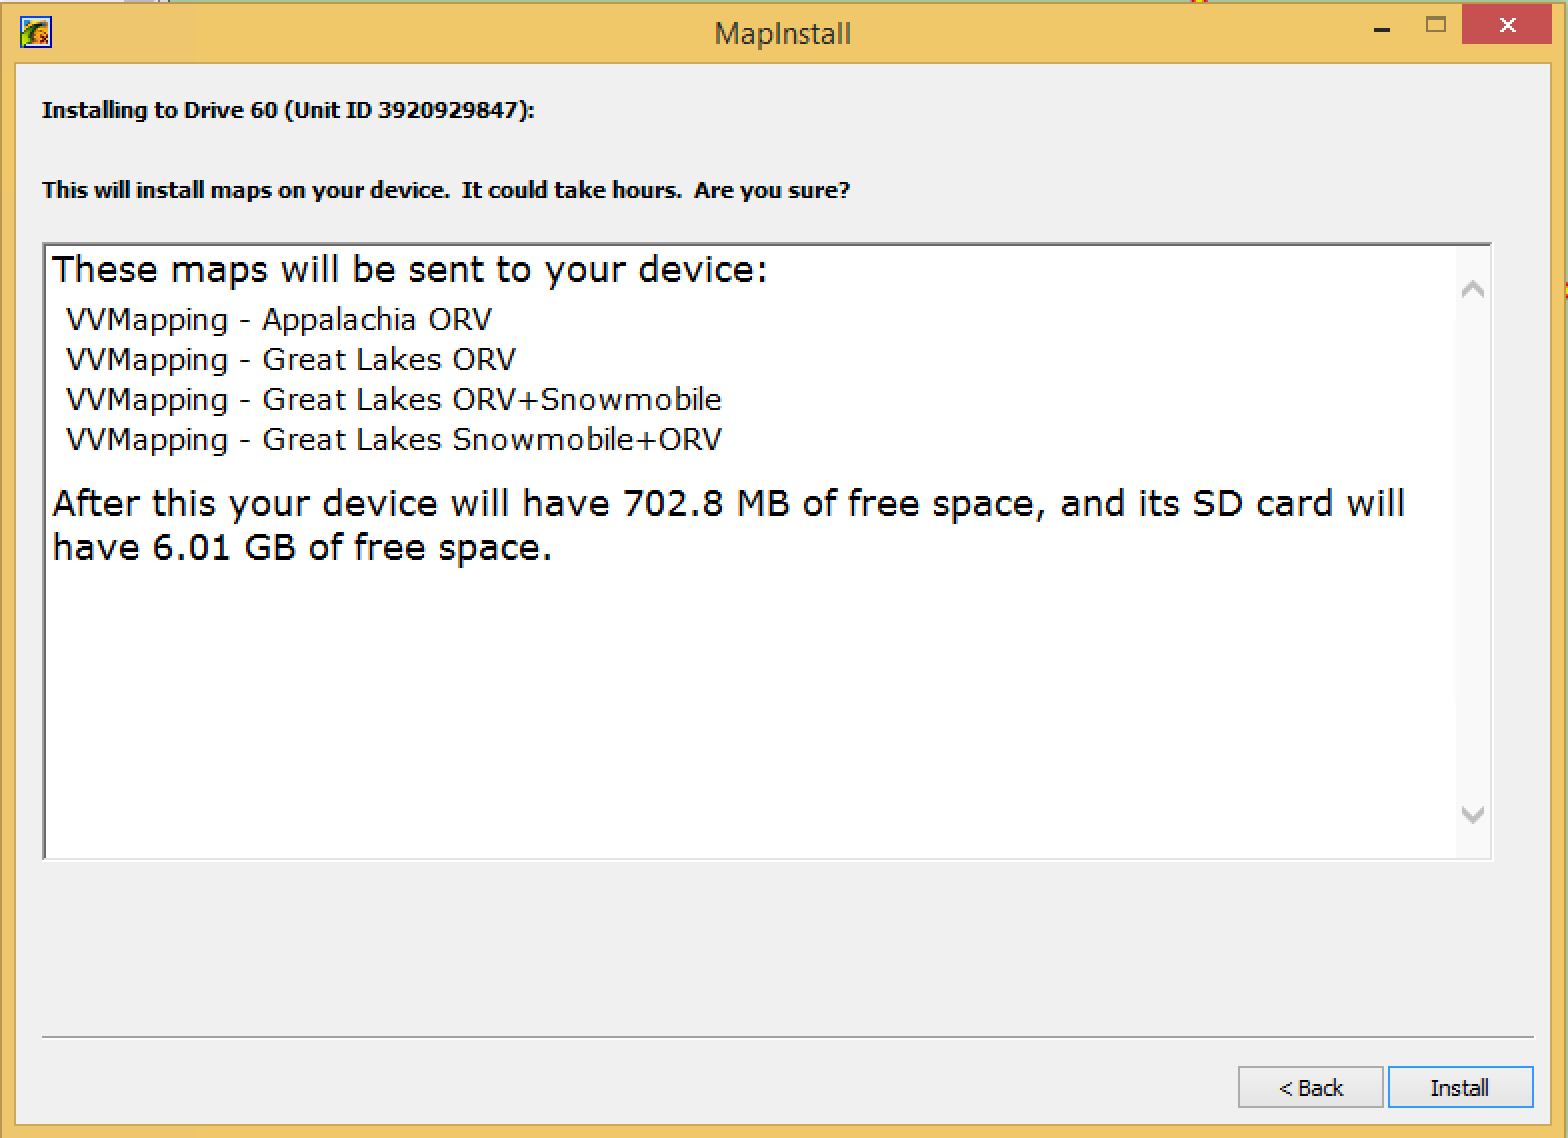
When it's complete, click the Finish button. Your GPS is loaded and ready for use.
Custom Map Install/Selection
If you do not have a GPS plugged in, just a memory card, you will have to use the custom install, click Continue.
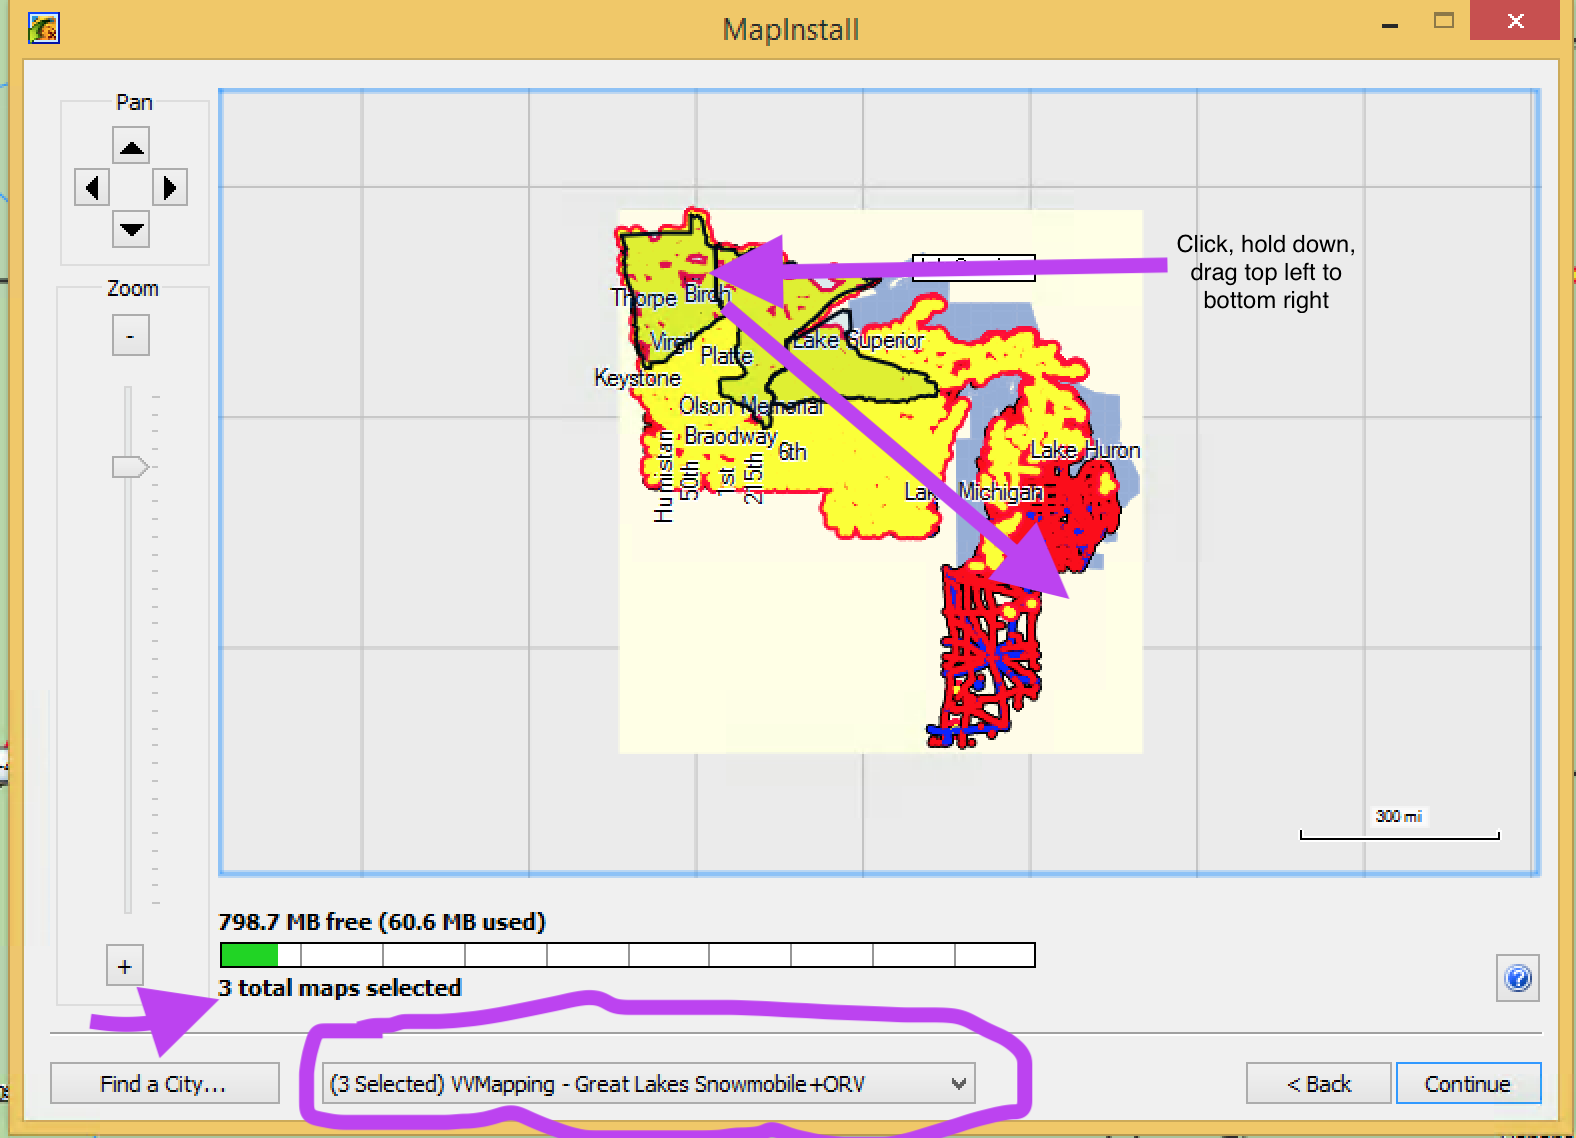
This process requires that each segment of our map is manually selected. Put the mouse so it is just above and to the left of MN, click and hold down and drag to the bottom right. This will select all of the segments. In the screen shot, only three of the segments have been selected, they have the black border around the selected segments.
Note at the bottom of the screen which map it is that you are selecting from.
Update Maps already on the GPS by installing a new version.
If you want to update maps already on your GPS, they will need to first be removed, then the new version can be installed (limitation of Garmin's program).
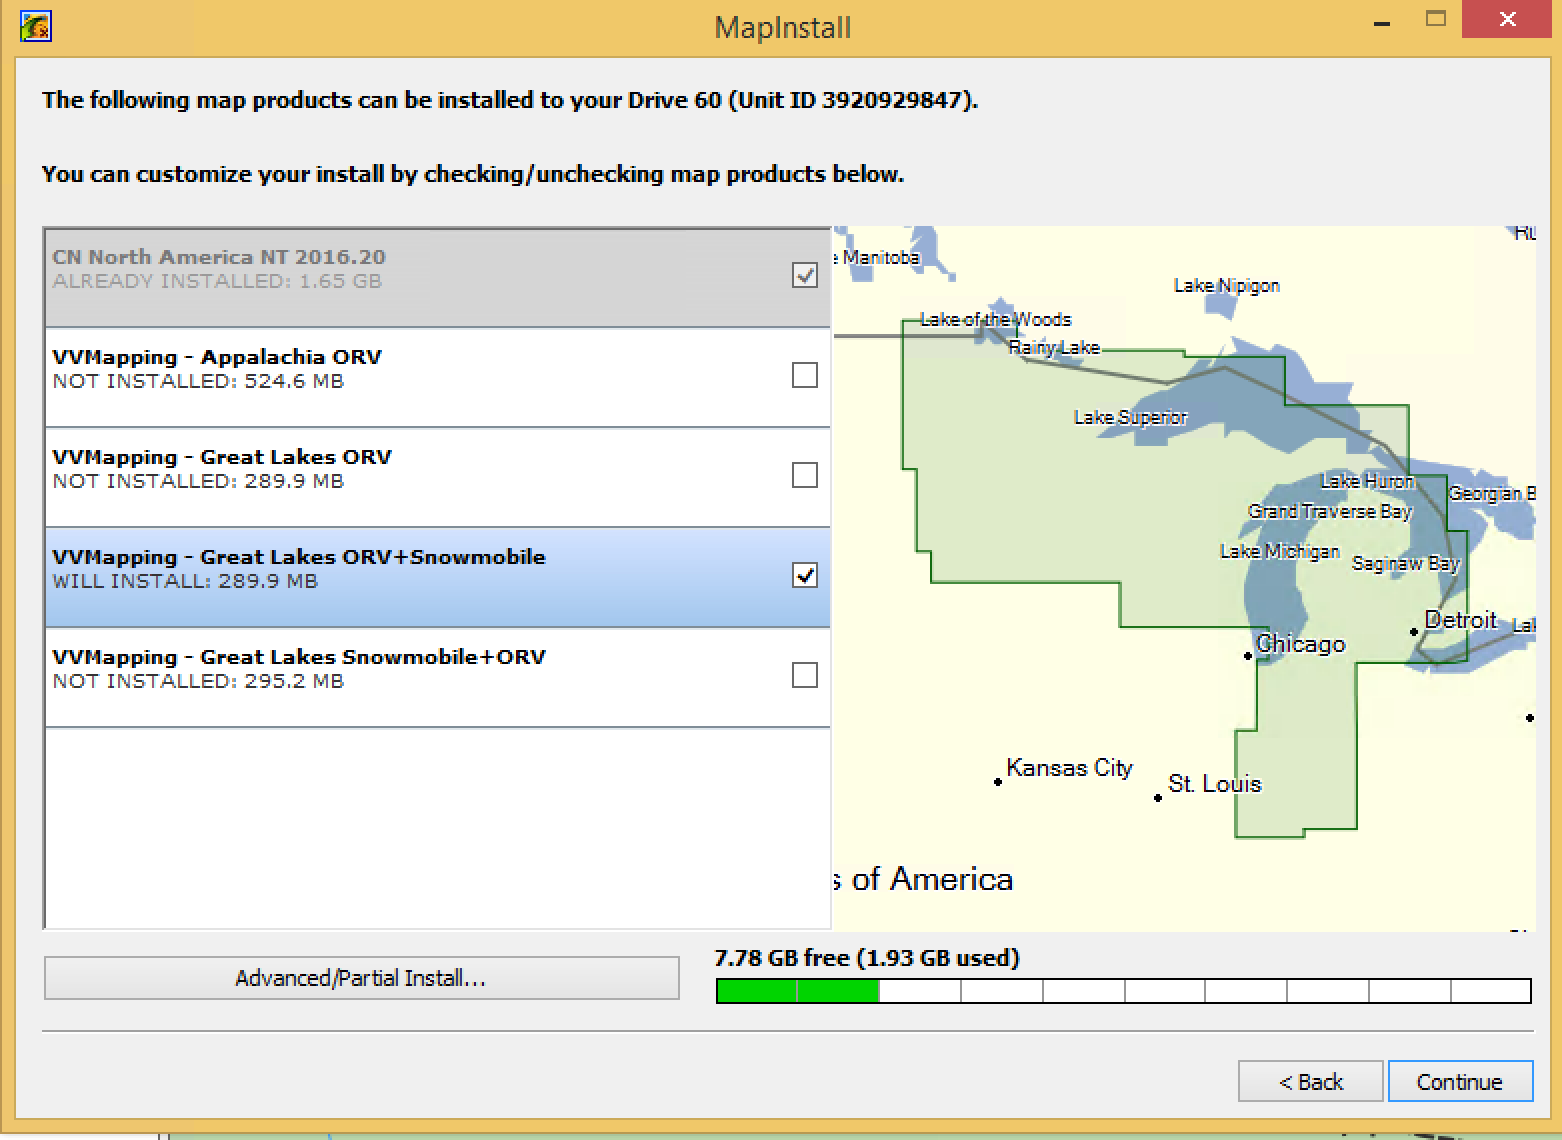
Choose "Install Maps" from the Maps menu in Basecamp. When MapInstall opens, choose Customize.
On the customize screen, it will list which maps are already installed and have a check box by their name. Uncheck that box and then click Continue.
On the summary screen it will indicate that maps will be removed. Click Install. When done, the maps are removed. You can now choose "Install Maps" from the Maps menu in BaseCamp and it should offer to install the maps (as shown further up).
Use Garmin's MapSource program.
The basic steps are: Select the map tiles in MapSource using the Map Tool, then use the Send to Device button to send the maps to the GPS.
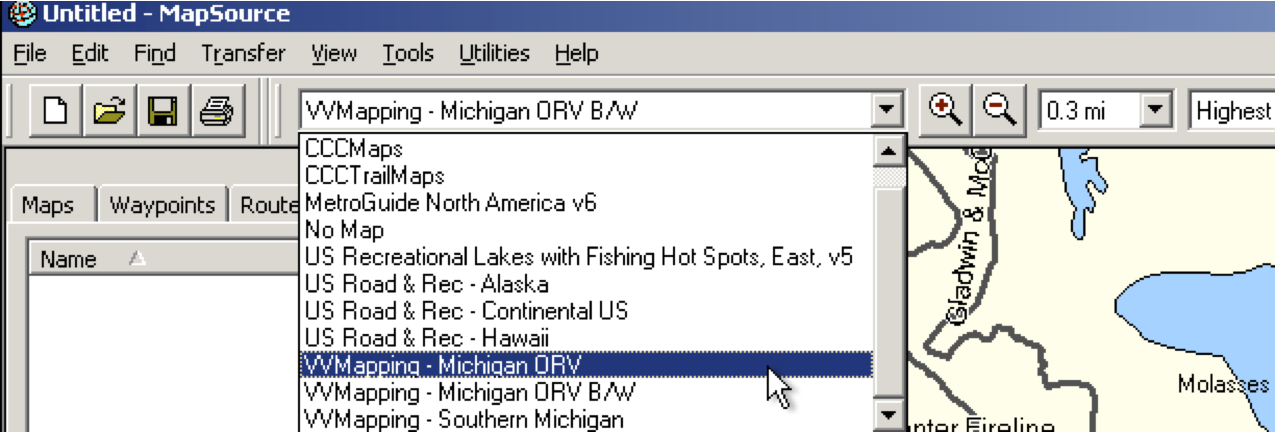
Open the MapSource Program.
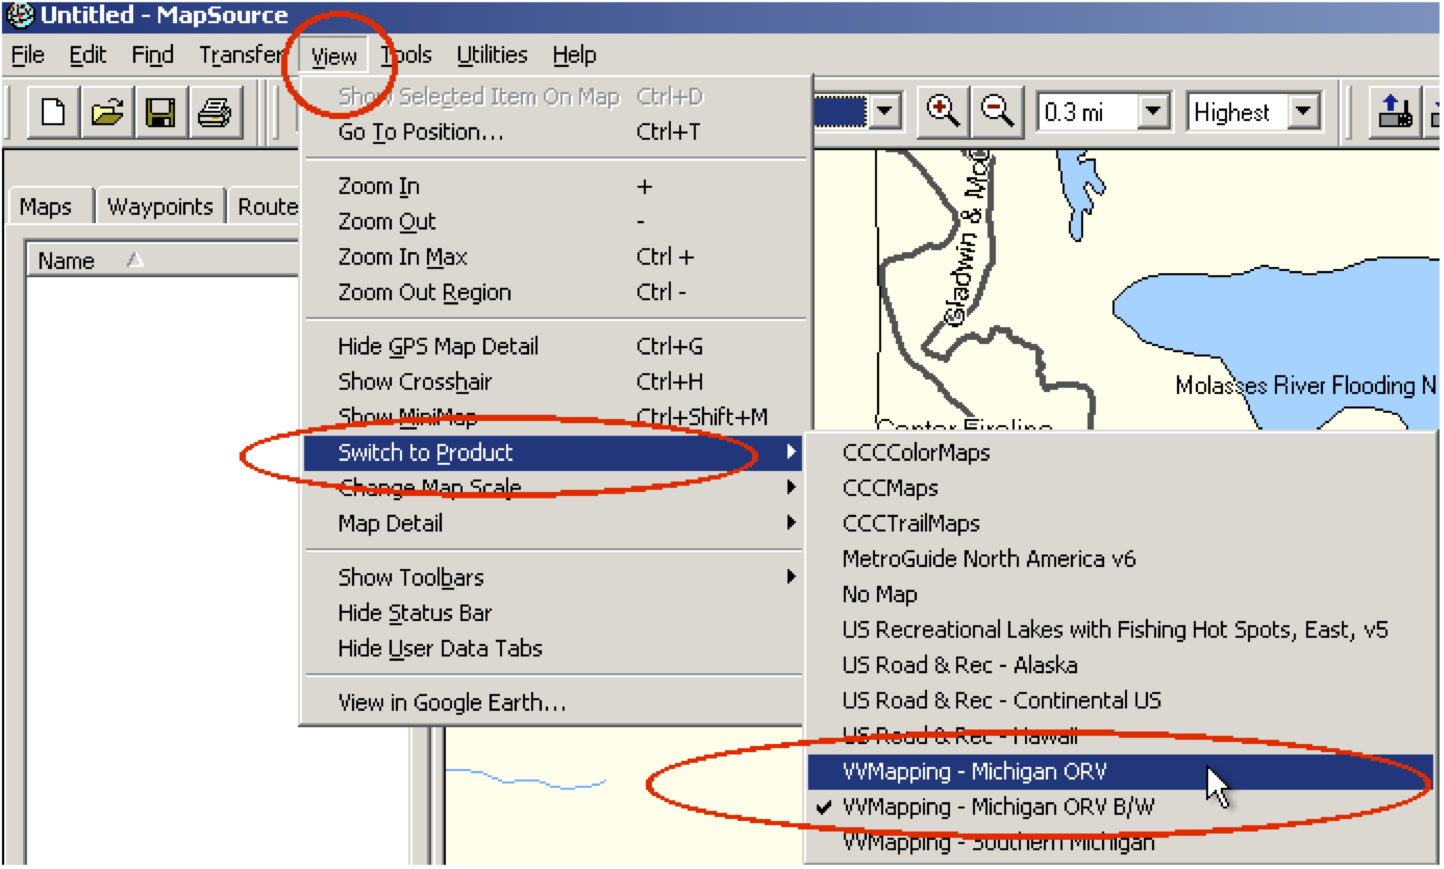
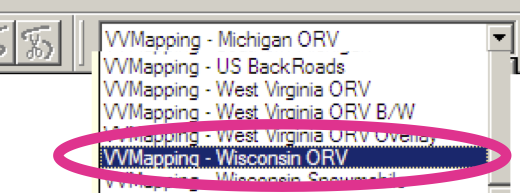
The VVMapping Maps will be listed in the Products menu, if not already selected, choose them from this menu. You can also pick from the "Switch to Product" menu under the "View" menu.
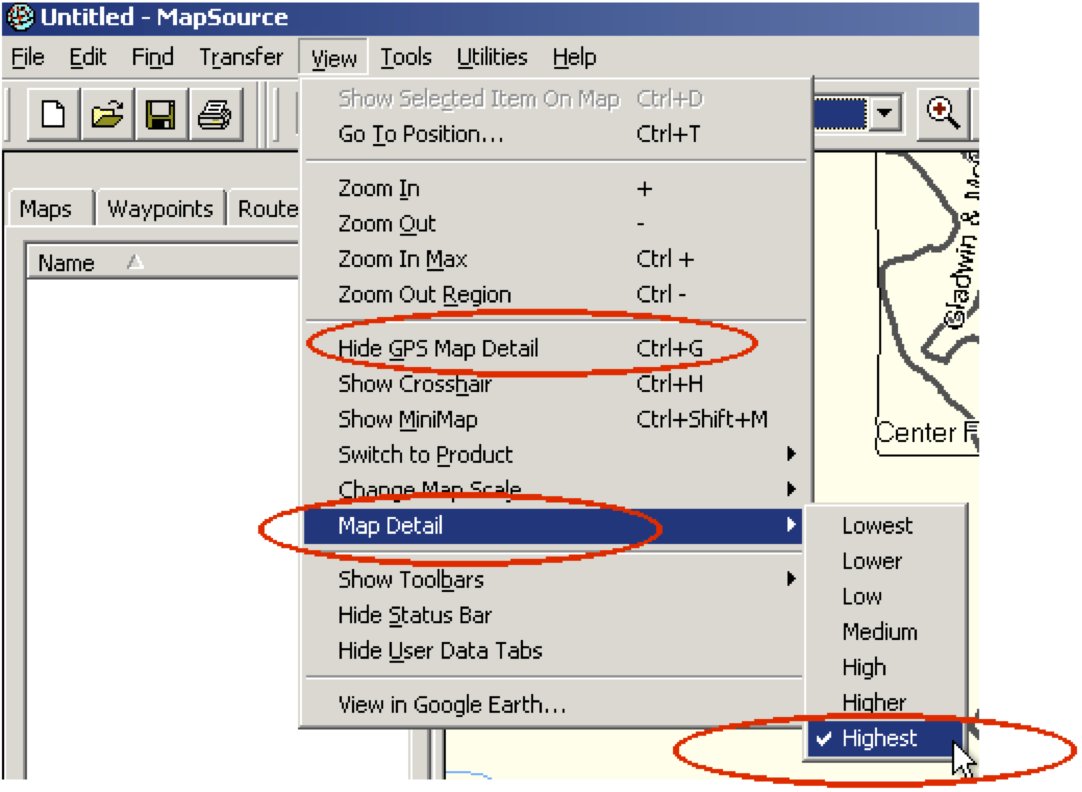
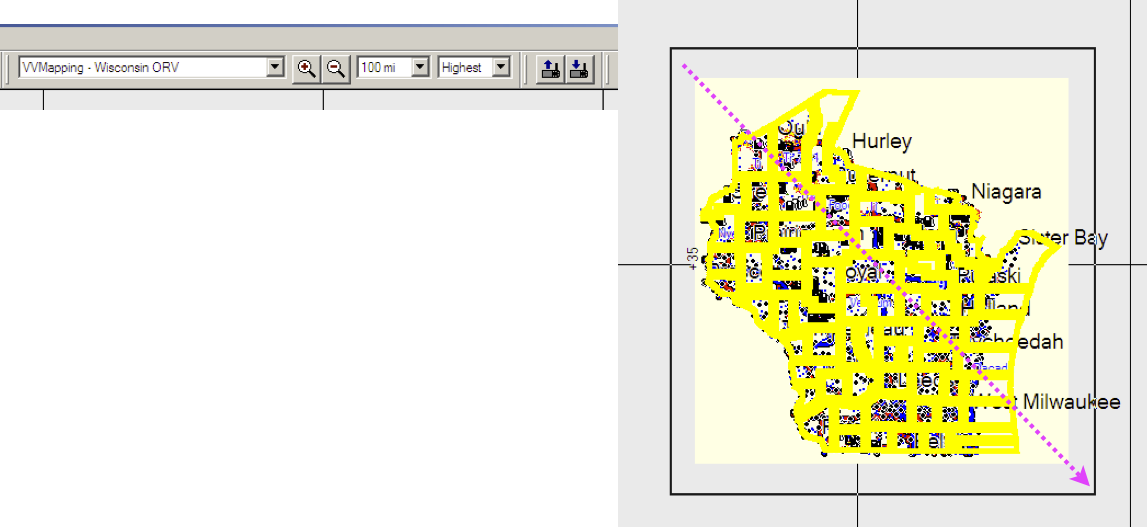
Make sure that the map detail is set to highest and that "Show GPS Map Detail" is enabled. Note that if the map detail is currently being "shown" (what you want) the menu will actually say "Hide GPS Map Detail".
Feel free to explore the map, zoom in and out and notice the features and information provided. Trails should be visible at most any zoom as well as major highways. The fine detail, such as public land, streams and minor roads, will not display unless you are zoomed in to 3 miles or lower.
To load the maps to your GPS, first choose the "Map Tool" from the tool bar (looks like a poorly drawn capital letter B). This tool will allow you to select each map segment by clicking once on them. You may also click and drag across several map segments to choose several at once. Each map segment represents one county. The easiest method is to zoom out to 150 miles so you can see the entire State, position the cursor above and to the left of the State, click and hold the mouse button down while dragging the cursor to the bottom right. This will select all of the map tiles at once.

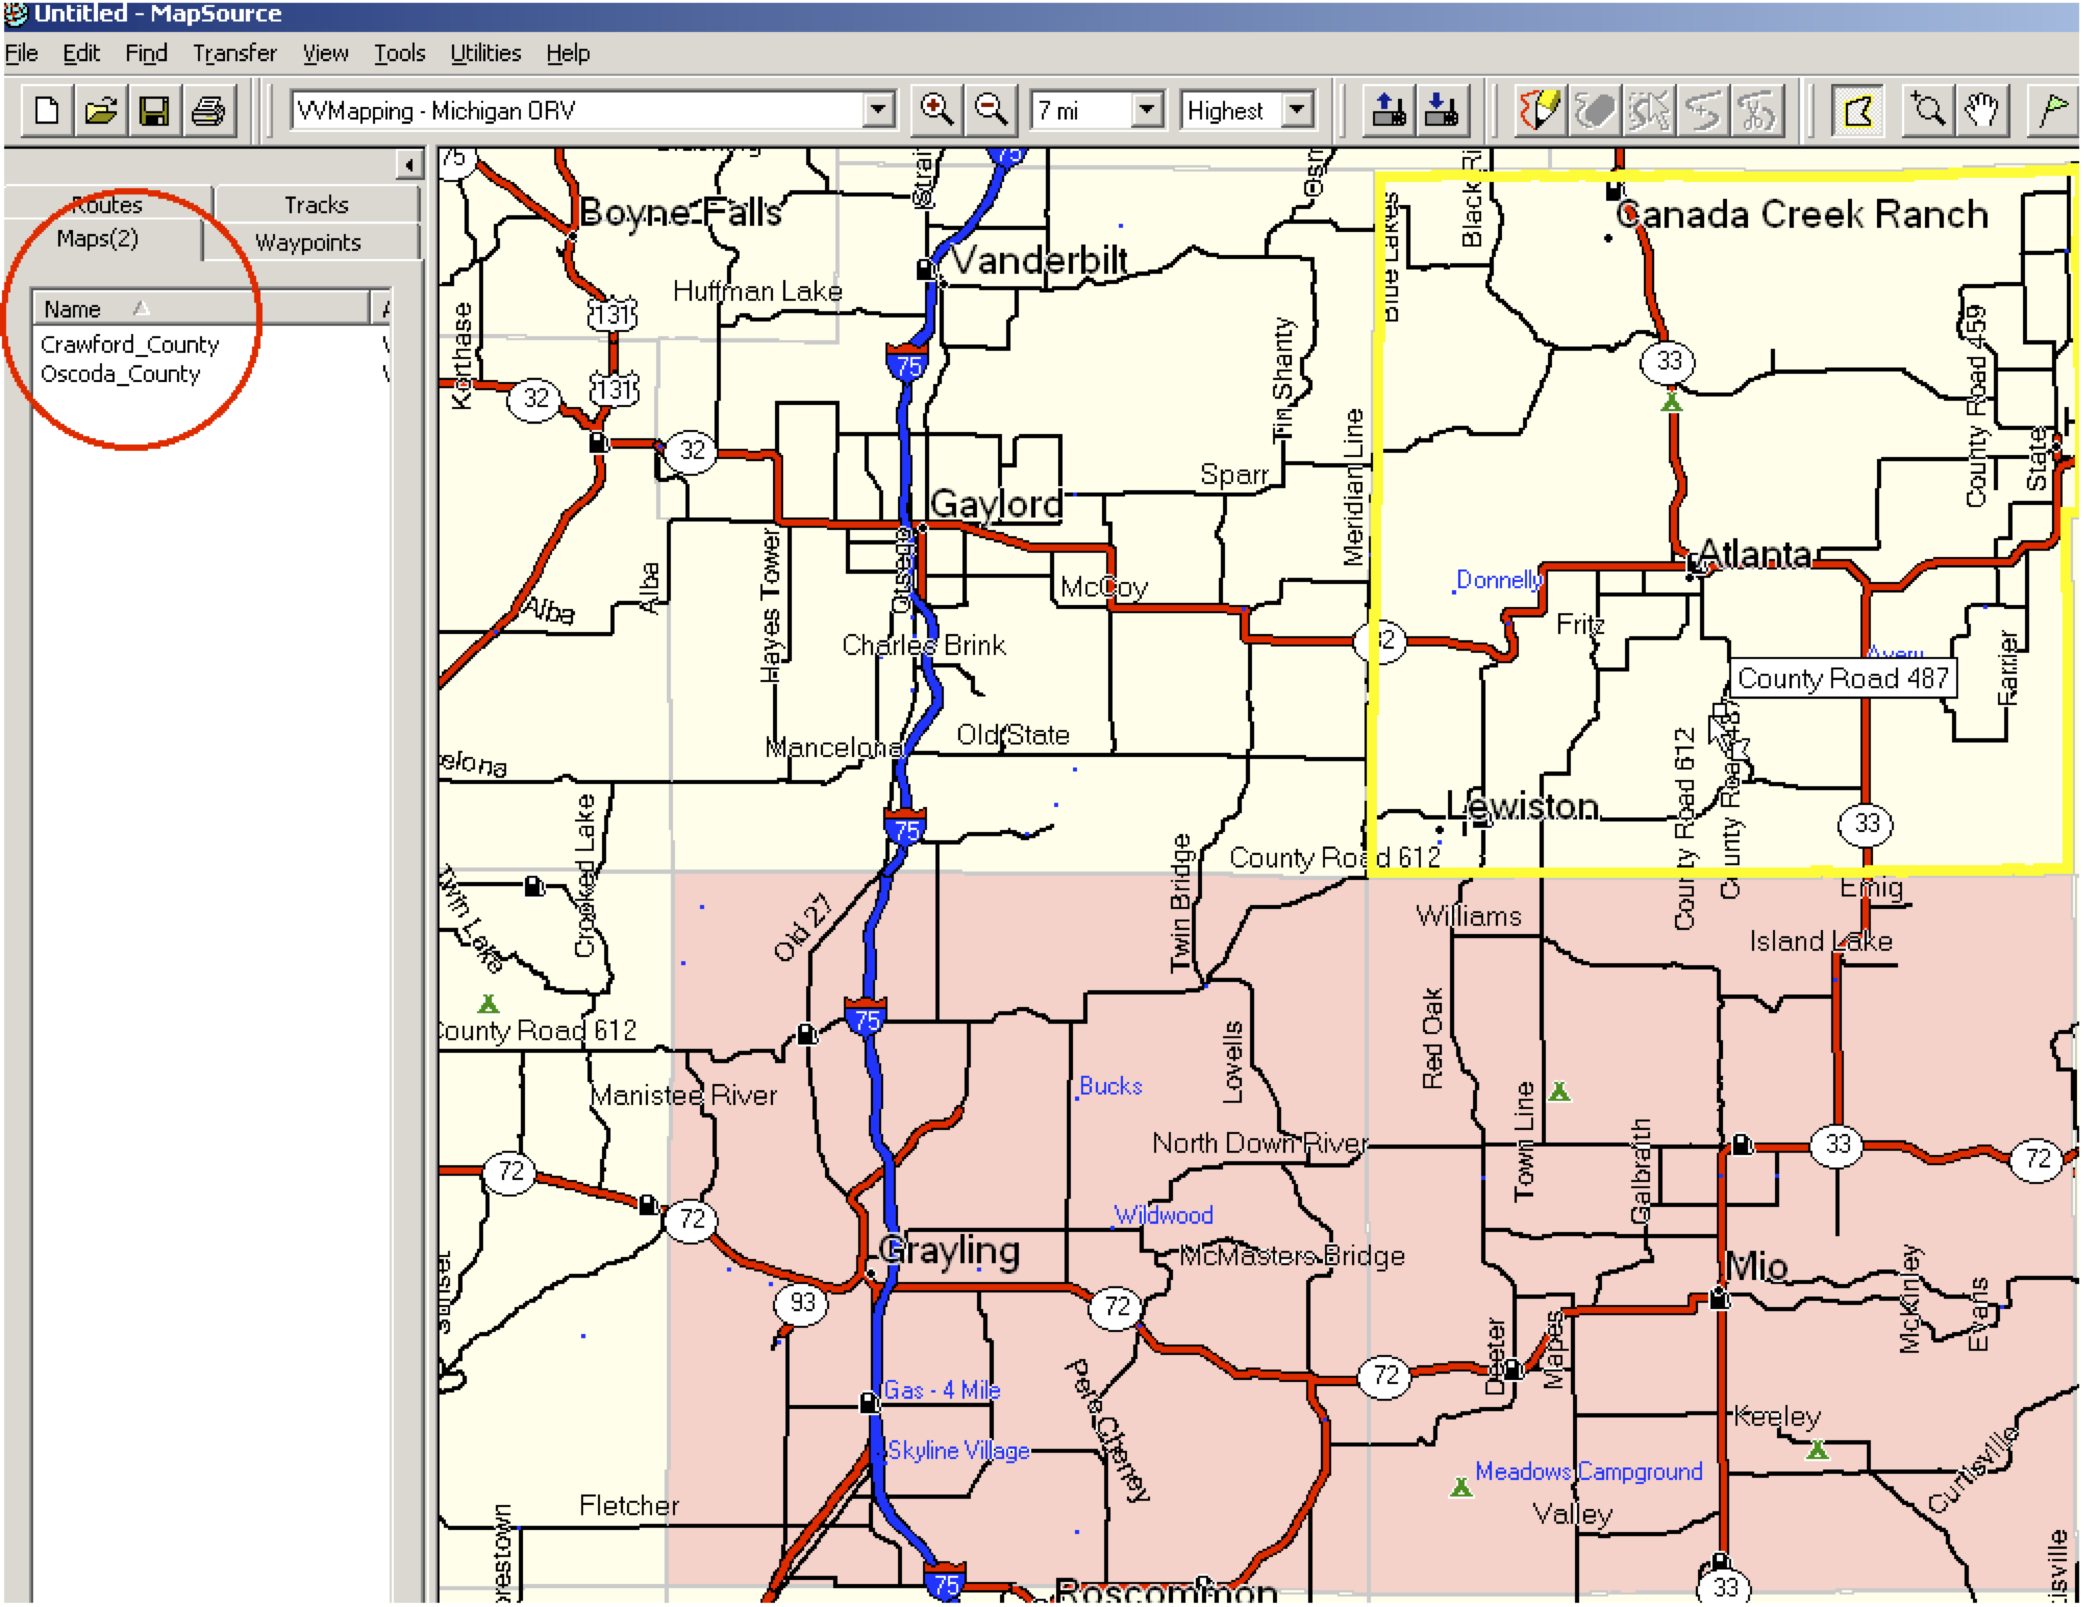
As you select the map segments, they will be highlighted with a different color (pink, usually). Each segment will also appear in the "Maps" panel on the left side of the screen. At the bottom of the "Maps" panel, it will show how much memory the selected maps will occupy on your GPS. This is important to note since each model of GPS has a limit on how much map data it can hold. The computer will indicate if too much has been selected when you try to send it to the GPS.
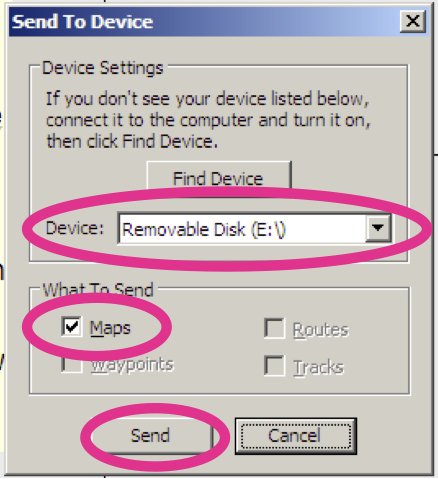
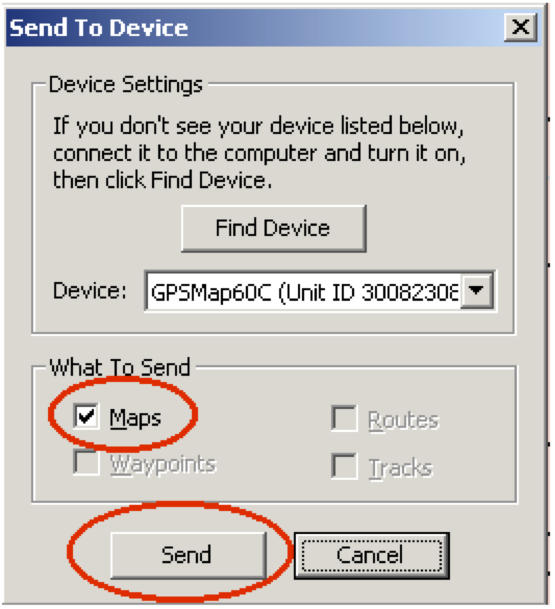
Once you have selected the map segments you want to load into the GPS, connect your GPS to the computer and power the GPS unit on. Click the "Send to Device" button or choose "Send to Device" from the "Transfer" menu. The Send to Device window should appear. It should find your GPS and list it in the "Device" menu. Make sure that "Maps" is the only item checked and then click the "Send" button. Depending on the GPS and the number of maps you have chosen this may take anywhere from a couple minutes to an hour or longer.

If your computer has difficulty locating the GPS when you try to send the maps to it, the easiest solution is to simply disconnect and then reconnect the GPS to the computer; additionally turning the GPS off and then back on and as a final attempt try restarting the computer.
Use Garmin's MapInstall program.
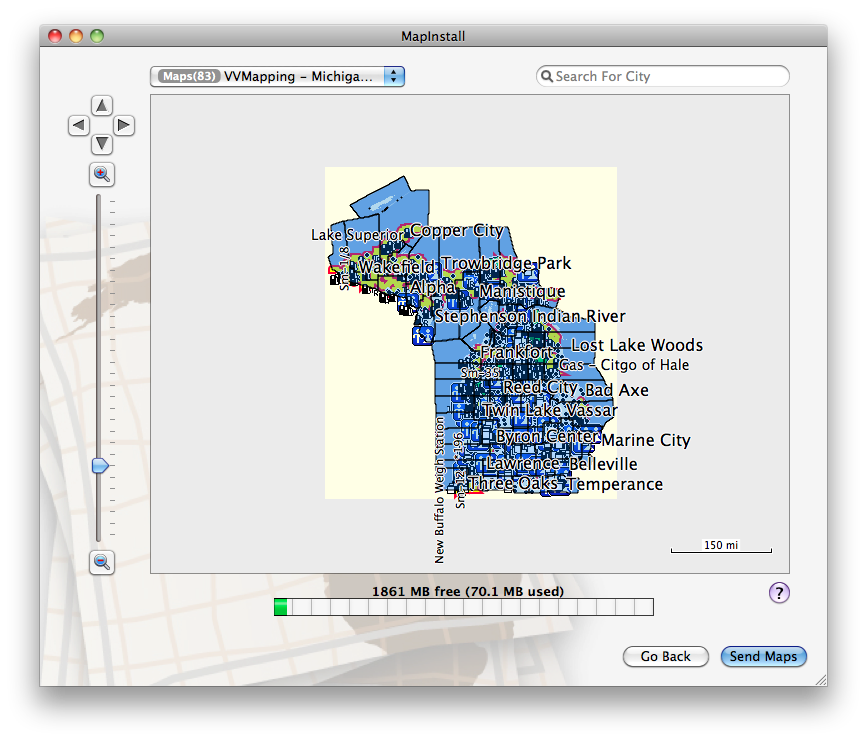
To load the maps to your GPS using Garmin's software, open the MapInstall application from your Applications folder. It will allow you to click on the individual map tiles to select them, then click the "Send" to GPS button to load the maps to your GPS.
In this example we are using a memory card connected to the computer. If your GPS is plugged into the computer, it should be listed in the device window where you see "VVMapping" below.


On the screen showing the maps, click on each map segment (county) or:
Put the mouse to the top and left of the map (above and to the left). Click and hold down the mouse button and drag to the bottom right. This will "draw a box" and select all of the counties as you are dragging - selecting all of the maps. Once selected, click the SendMaps button to send them to the GPS or memory card.
Once the maps are sent to the GPS, it's ready for use.
You can load mulitple maps using the same procedure, but before sending to the GPS, select the additional maps first.
To load multiple map "sets", such as both WI and MI, is easiest to use MapSource. Use the Map Tool to select the first State, switch to the other State, select those maps and then send the entire "set" to the GPS/memory card.
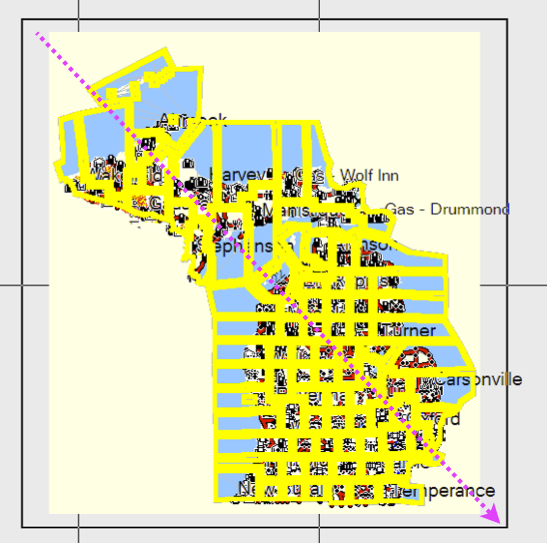
Click on Map Tool in the tool bar to select it. Zoom out far enough to see the entire State on the screen.

Place the cursor to the top and left of the State, click and hold down and drag to the bottom right. This will "draw a box" across the State and select each county as you drag (the bright yellow is highlighting each selected county).
Next switch to the other Map via the Installed Products menu in the tool bar (or via the View menu at top)
Repeat the process as above for selecting the maps:
Place the cursor to the top and left of the State, click and hold down and drag to the bottom right. This will "draw a box" across the State and select each county as you drag (the bright yellow is highlighting each selected county).
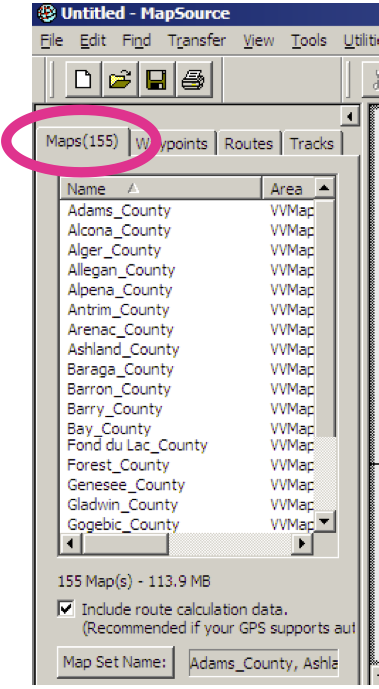
On the left side of the window, under the Maps tab will be a list of maps. It will indicate in parenthesis how many maps are selected. Note that the number is increasing when selecting additional maps.
Once all of the maps are selected, click the Send to Device button or choose Send to Device from the Transfer menu.

In the Send to Device window, make sure your card is listed in the Device menu or if not using a card, your GPS is listed. With "Maps" checks, click the "Send" button.
Note that anytime you send maps to the card/GPS it will remove any maps previously sent and replace them with this new set.